

How to Change Clip Layout
You can also change the layout of your video.
Auto: Recognize and focus on the face of the person speaking. In scenes where the speaker's face is unrecognizable, Fit is applied.
Fill: Fill horizontal footage into a vertical format. It is locked to center alignment, so the speaker's face may not be in focus.
Fit: Fits the horizontal footage so that it is all visible in portrait format. This can result in a lot of white space at the top and bottom. You can set the clip background color to fill in the gaps.
1:1: Displays landscape footage so that it appears square in portrait. There may be some white space at the top and bottom. You can set the clip background color to compensate for the white space.

How to Change Clip Background Color
If your footage doesn't fill the portrait format canvas, there will be empty space. That space is filled with a blur effect by default. However, if you want to fill this area with a different color, you can change it to a different color using the options below.


How to Add B-roll
On the Captions tab, you can add B-roll footage at the start of a specific caption to make your video dynamic and not boring.
Click the B-roll icon in the caption,

or click a specific word and then the Search b-roll button

You can then search for B-roll footage directly with those words.

And all you need to do is add a duration for the B-roll footage.


You can also search by movie title, actor, or scene to use movie footage as B-roll,

You can also upload your own video files to use as B-roll footage.

How to Add Transition Effect
You can also add a professional transition effect to the point where a particular caption begins. There are many options, so you can click to preview and add them.

How to Add Sound Effect
At the beginning of a particular caption, you can add a sound effect. You can use trendy sound effects that are often used in TikTok and Instagram clips.

How to Add Video Effects
At the beginning of a particular caption, you can add a video effect. You can use trendy video effects that are often used in Instagram and TikTok clips.

How to Add Highlight Caption Effect
Click the T button on the caption to open Highlight Caption and apply special effects to the caption.

Once you have selected the desired effect from the ones shown in the preview,


you can adjust the Y-coordinate of the caption by clicking the Move Up & Down buttons.

If you choose blending effect, it is blended with the video behind.

How to Add or Change Meme Hook
Click the Hooks tab to see the meme hooks menu. When toggled on, you can add a meme video to the front of your video, giving your video a hook.

Click the Example button to see an example TikTok/Instagram video that uses this meme video.

How to Add or Change Video Overlay
By clicking the Video overlay toggle (previously called Game Video) in the Hook menu, you can add or change a looping video, such as gameplay footage or your own upload, at the bottom of your clip.

How to Add or Change Hook Title
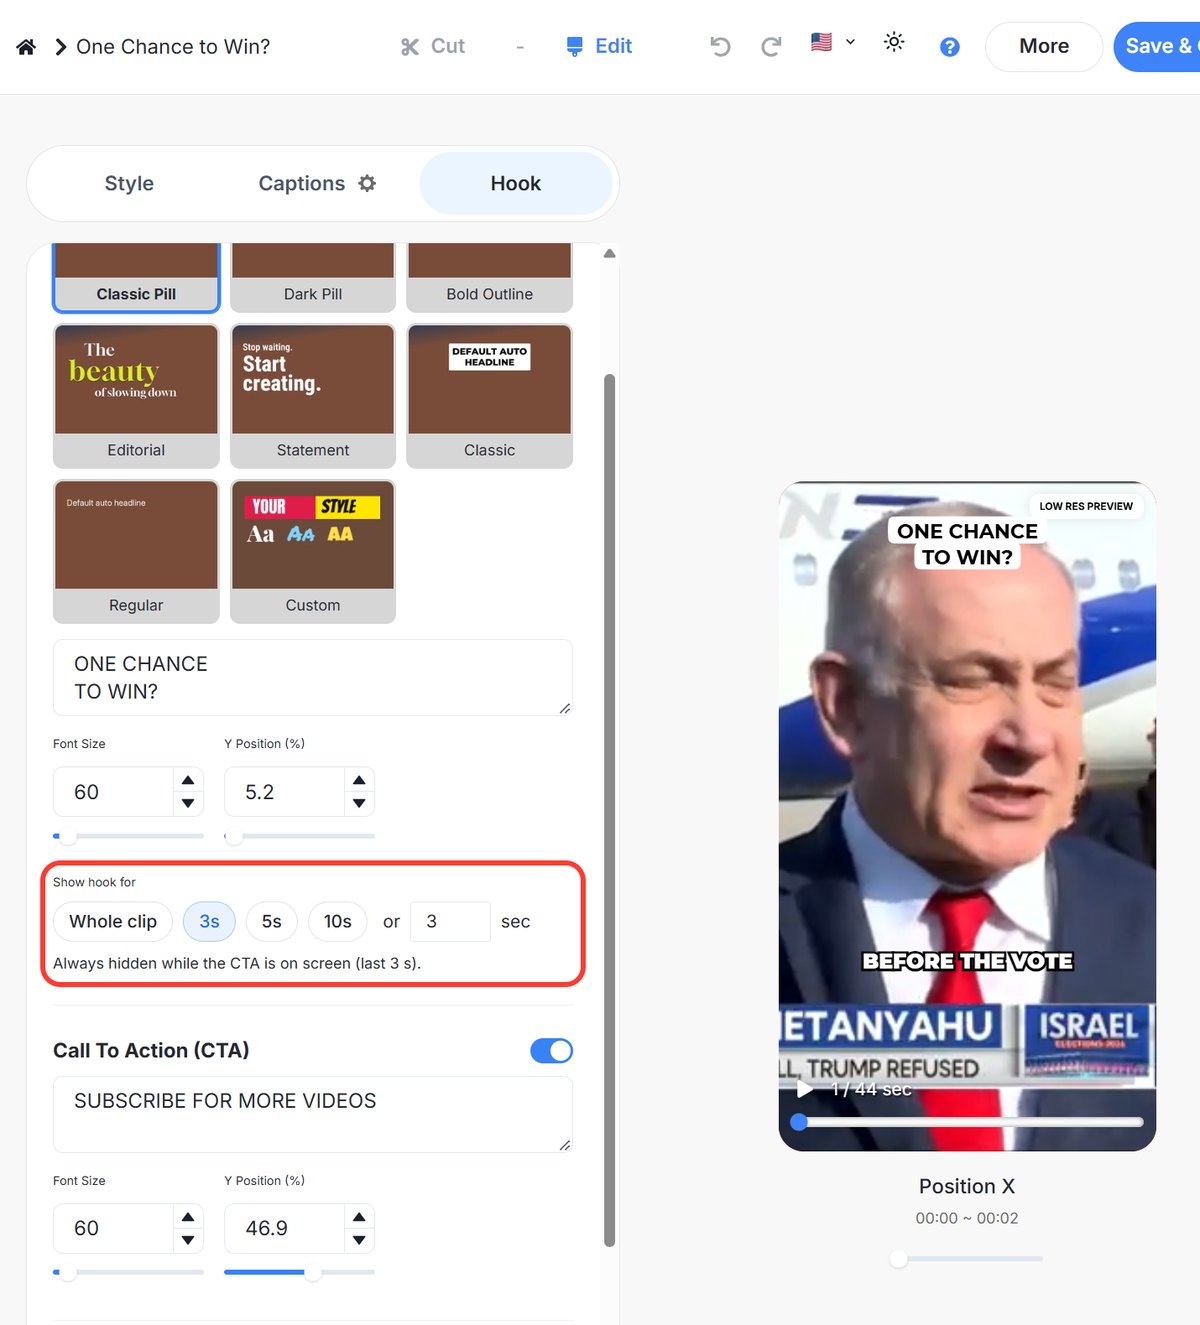
The Hook title menu in the Hooks menu allows you to display a title on your clip. Adding a title that encourages viewers to watch the video to the end can help improve retention.

You can also adjust the font size and position of the title.

The Y Position (%) setting, which moves the title up or down, is available on the Custom style and the three pill styles (Classic Pill, Dark Pill and Bold Outline). The other styles (Regular, Classic, Editorial and Statement) keep the title in a fixed position.
How to Add or Change CTA
The CTA menu in the Hooks menu allows you to display a CTA in your video, as well as adjust the font size and position of the CTA.

When the hook title and CTA appear: the hook title shows from the start of the clip until the CTA appears, then leaves, so the two are never on screen together. The CTA appears in the last few seconds of the clip. If the CTA is off, the hook title stays until the end of the clip. The Editorial and Statement styles animate in and leave after about 4 seconds.
To show the hook title for less time: in the Hook tab, use Show hook for below the hook title settings. Pick Whole clip, 3s, 5s or 10s, or type the exact number of seconds. Then click Save & Compile. The hook still leaves earlier if the CTA starts first. This setting doesn't apply to Editorial and Statement.
You can also choose it before your clips are made, in Get Shorts → Advanced Options → Hook Title → Show hook for, and in your automation settings. Your choice is saved for next time.
Clips made before November 12, 2026 keep the old timing (hook for the whole clip) until you open them in the editor and click Save & Compile.
How to Add Background Music
By clicking the Background Music toggle on the Hooks tab, you can add different background music. Choose a track from the Library tab, or choose Your Music to upload your own MP3 (up to 25MB each) and select it. Before generating a project, you can do the same under Advanced Options → Background Music → Select → Your Music. Setting Background Music to Random picks from Ssemble's library plus your uploads. Random from only your own tracks is not available yet. Music can't be added from a YouTube link, and there is no playlist feature.

How to Undo/Redo Any Changes
The Undo and Redo buttons in the top right corner of the editor allow you to undo and redo any changes.
